
If you’re seeking a gentle, creative outlet to unwind and nurture your spirit, a nail stamping tutorial might be the perfect addition to your self-care routine. Nail stamping offers a soothing way to express your personality through professional-looking designs, even if you’re new to nail art. With a few simple tools and a touch of patience, you can transform your nails into tiny canvases of tranquility, letting calming patterns bring a sense of order and beauty to your day. This step-by-step guide will show you how to master nail stamping at home, using calming colors and nature-inspired motifs to create a peaceful ritual. Whether you want to pamper yourself after a long week or invite a friend to join in, you’re about to discover how nail stamping can become a cherished act of mindfulness and self-expression.
Discover the Joy of Nail Stamping for Self-Care Rituals
Nail stamping isn’t just a fun hobby—it’s a mindful activity that encourages you to slow down and savor the present moment. When you immerse yourself in the creative process, each step becomes an opportunity to breathe deeply, focus your thoughts, and let go of stress. The repetitive, rhythmic motions of stamping designs onto your nails can feel meditative, helping you reconnect with your inner calm.
Incorporating nail stamping into your self-care rituals allows you to celebrate small acts of creativity and self-love. As you watch delicate patterns take shape beneath your fingertips, you may find a sense of accomplishment and joy blooming within. This simple, accessible art form reminds you that beauty and peace can be found in the smallest details of daily life.
Gathering Your Tools: What You Need to Get Started
Getting started with nail stamping is easy when you have the right tools by your side. At a minimum, you’ll need a nail stamper, a scraper, stamping plates with engraved designs, a quality stamping polish, a base coat, and a top coat. These essentials create the foundation for crisp, professional-looking results.
To make your experience more seamless, consider picking up a few extras like a silicone mat for easy cleanup, cotton pads, acetone for cleaning your plates, and a detail brush for touch-ups. Having everything organized and within reach helps set the tone for a relaxing, enjoyable creative session. With your nail stamping kit prepared, you’ll be ready to bring your artistic visions to life.
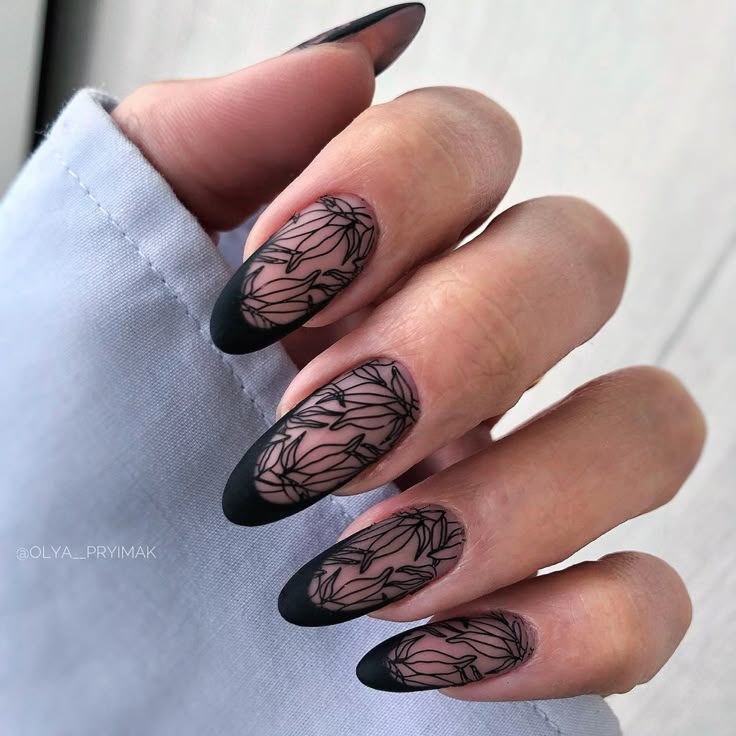
Choosing Calming Colors and Nature-Inspired Patterns
The colors and patterns you choose can significantly influence the mood of your nail art. For a calming effect, reach for soft pastels, muted earth tones, or tranquil blues and greens. These shades evoke the serenity of nature and invite a sense of peace into your daily routine.
Nature-inspired patterns—think delicate leaves, gentle waves, or subtle florals—add an extra layer of mindfulness to your designs. These motifs can serve as tiny reminders to pause and appreciate the beauty around you. By intentionally selecting soothing colors and natural patterns, you can transform your nail stamping into a restorative, grounding practice.
Setting a Serene Space for Your Creative Practice
Creating a peaceful environment is key to enjoying your nail stamping ritual. Begin by tidying your workspace and gathering all your supplies, so you can move through each step without distraction. Consider diffusing a favorite essential oil, playing soft nature sounds, or lighting a candle to set a calming mood.
Minimize interruptions by letting loved ones know you’ll be taking some time for yourself. Settle into a comfortable chair with good lighting, and take a few deep breaths before you begin. By honoring this time as a special self-care moment, you invite deeper relaxation and presence into your creative process.
Preparing Your Nails for a Smooth Stamping Experience
Before you dive into stamping, it’s important to give your nails a little TLC. Start by washing your hands thoroughly and gently pushing back your cuticles to create a clean canvas. Trim and file your nails to your desired shape, smoothing any rough edges to ensure the designs will adhere evenly.
Next, lightly buff the surface of each nail to remove shine and help the polish stick. Wipe your nails with an acetone-soaked pad to remove any oils or debris. Taking these steps not only helps your stamped designs look their best, but also supports the overall health of your nails.
Selecting and Applying the Perfect Base Coat
A high-quality base coat is your secret weapon for long-lasting, flawless nail stamping results. Choose a base coat that suits your nail type—strengthening formulas for weak nails or ridge-filling options for a smooth surface. Apply a thin, even layer to each nail and allow it to dry completely before moving on.
The base coat acts as a protective barrier, preventing staining and creating a smooth foundation for your color polish and stamping designs. By investing a little extra time in this step, you ensure that your finished nail art will last longer and look more polished. Think of it as priming your canvas before painting a masterpiece.
Mastering the Stamping Technique Step by Step
To achieve crisp, professional-looking stamped designs, follow these step-by-step instructions:
- Apply a layer of your chosen stamping polish to the design on your stamping plate.
- Use the scraper to gently swipe away excess polish, leaving it only in the engraved areas.
- Quickly press the stamper onto the plate to pick up the design, then roll it over your nail for even transfer.
Work efficiently, as stamping polish dries quickly. If the design doesn’t transfer perfectly the first time, don’t worry—practice is key! With each attempt, you’ll gain more confidence and control, and soon you’ll be creating beautiful stamped nail art with ease.
Layering Designs for a Soft, Professional Finish
One delightful aspect of nail stamping is the ability to layer multiple designs for added depth and interest. Start with lighter, more subtle patterns as your base, then add bolder accents on top for a dimensional look. This technique mimics the sophisticated effects seen in professional nail salons.
Experiment with semi-transparent colors or overlapping nature-inspired motifs to create soft, dreamy designs. For example, stamp delicate white ferns over a muted green base, then add tiny gold dots for a touch of shimmer. Layering allows you to express your creativity while maintaining a serene, cohesive aesthetic.
Troubleshooting Common Nail Stamping Challenges
If your stamped designs aren’t turning out as expected, don’t be discouraged—every artist faces a learning curve. Common issues like incomplete transfers, smudging, or blurry edges can often be solved by adjusting your technique. Make sure your stamping plate is clean, use a light touch when picking up and applying the design, and work quickly to prevent polish from drying.
Sometimes, the problem lies with the products themselves. Experiment with different stamping polishes and stampers to find what works best for you. Remember, patience and practice are essential, and even small imperfections can add unique charm to your nail art.
Mindful Moments: Enjoying the Process, Not Just Results
Nail stamping offers more than just beautiful results; it provides an opportunity to be fully present and mindful. Allow yourself to slow down, notice the gentle sound of the stamper, the sensation of polish gliding onto your nails, and the satisfaction of seeing your design come to life. Each step can become a mini meditation, helping you reconnect with yourself.
Release any pressure for perfection and focus on the joy of the creative journey. Celebrate the tiny victories—a smooth transfer, a color combination that makes you smile, or simply the peacefulness of the process. By savoring these moments, you transform nail stamping into a soul-nourishing self-care ritual.
Caring for Your Nail Art to Make It Last Longer
Once you’ve finished your nail stamping masterpiece, a few simple steps can help your designs stay fresh and vibrant. Seal your work with a generous layer of top coat, being careful not to drag the brush through the stamped design. Allow plenty of drying time to avoid smudges and dents.
To extend the life of your nail art, wear gloves when doing chores, moisturize your hands and cuticles regularly, and avoid using your nails as tools. With a bit of mindful maintenance, your calming nail designs can remain a source of joy and pride for days to come.
Sources and Further Reading for Nail Stamping Inspiration
If you’re eager to deepen your nail stamping practice, there’s a wealth of inspiration available. Explore beauty blogs, YouTube tutorials, and Instagram accounts dedicated to nail art for fresh ideas and advanced techniques. Look for creators who share calming, nature-inspired designs that match your aesthetic.
Some wonderful resources to start with include:
- Simply Nailogical’s YouTube Channel
- NailStamping.com
- Reddit’s r/RedditLaqueristas
These communities offer a supportive space to share your creations, ask questions, and find endless encouragement on your nail stamping journey.
Embracing nail stamping as part of your self-care routine can bring a gentle sense of calm and creativity to your everyday life. With each stamped design, you’re not just decorating your nails—you’re honoring your need for beauty, mindfulness, and personal expression. Remember, every step is an act of self-kindness, and every imperfection is part of your unique story. I hope this nail stamping tutorial inspires you to create moments of peace and artistry, both on your nails and in your heart. If you try these tips or discover a new favorite design, share your journey and keep the creative spirit alive.